Archive

Archive for the ‘Windows’ Category

Windows 7 unable to connect to Wifi with WPA2-Enterprise (802.1

October 28th, 2021 No comments

I have deployed WPA2-Enterprise authentication on network. Computer should use computer certificate to authenticate to Wireless network. I deployed NPS server, configured all requirements. Windows 10 didn’t have problem to connect to Wifi network. Windows 7 computers have problem.

Problem

In eventviewer (Applications and Services Logs\Microsoft\Windows\WLAN-AutoConfig) I found following error:

Network Adapter: Intel(R) Centrino(R) Advanced-N 6205
Interface GUID: {c2c428cb-76cc-4474-a043-33ce2bfe9f0d}
Local MAC Address: 60:67:20:a6:42:63
Network SSID: SECURE_WIFI
BSS Type: Infrastructure
Peer MAC Address: 34:1F:a2:AF:C8:1E
Identity: DOMAN\USER1
User: USER1
Domain: DOMAIN
Reason: Explicit Eap failure received
Error: 0x80074005
EAP Reason: 0x4005
EAP Root cause String:
EAP Error: 0x4005

Solution

Problem is very weird. When you install NPS server, NPS server will use certificate to proof of identity. By default it uses certificate created from Windows CA Template called Kerberos Authentication. This certificate has empty attribute called Subject.

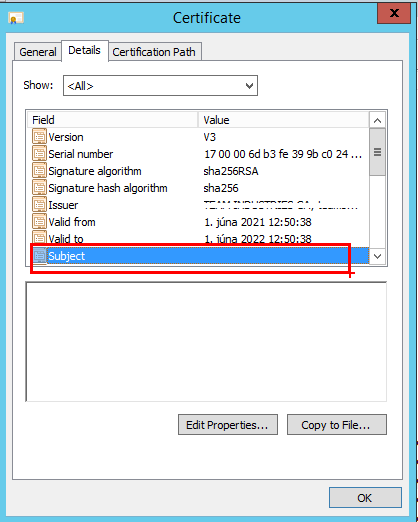
Windows 7 has problem that it doesn’t accept certificate with empty Subject attribute. Other OS’s worked fine. Solution to make it work is to populate this attribute into certificate. You can do it following way:

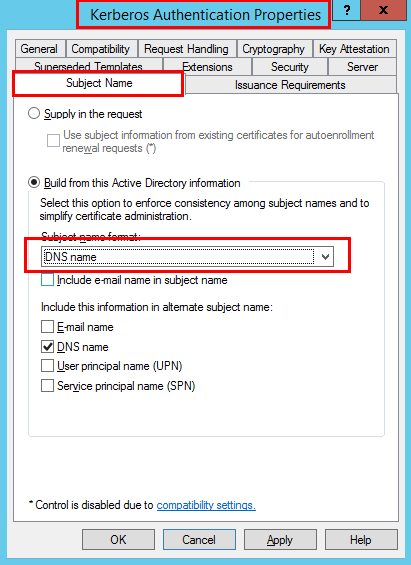
  • Go to Certificate Template console (use MMC, add snap in –> Certificate Templates) and change template called Kerberos Authentication.
  • Open properties of this template
  • Go to Subject Name tab
  • Change Subject name format to DNS name

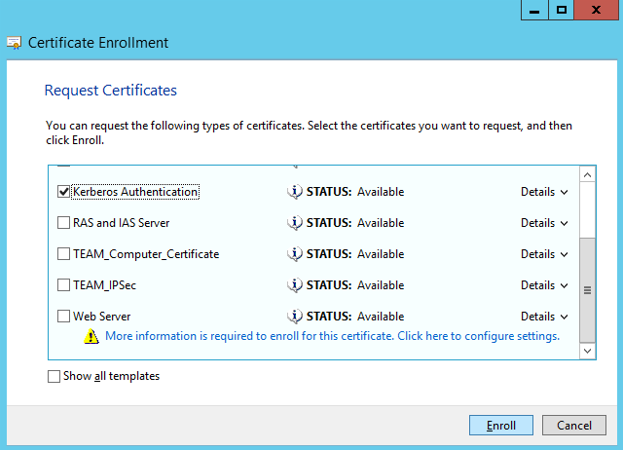
Now go to NPS server. Open the Certificates MMC (Computer), go to Personal / Certificates and right click in the details pane – All Tasks / request New Certificate. Request new certificate from template Kerberos Authentication for computer account:

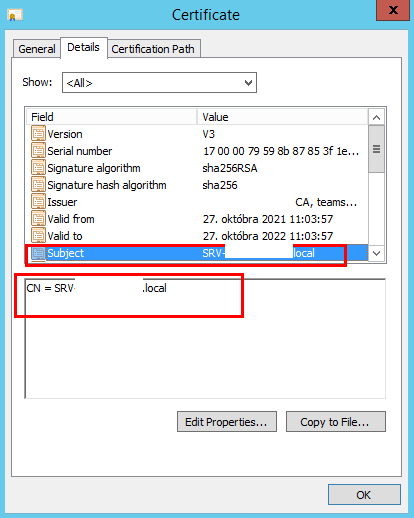
After new certificate is installed under computer certification store, you can find attribute Subject populated with DNS name of NPS server:

When certificate is OK, you can change certificate which should be used to proof identity.

Let’s make new certificate work on NPS server. Open NPS console. Go to Network Policies and open up your policy which handles 802.1x requests. Go to the Constraint tab, Authentication Methods / PEAP and click on Edit.

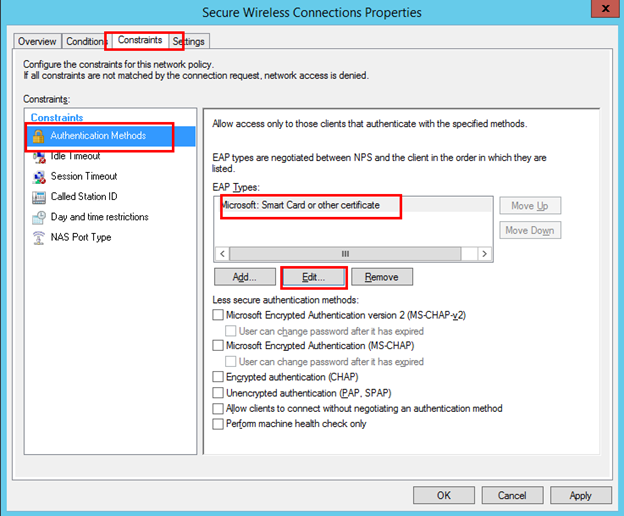
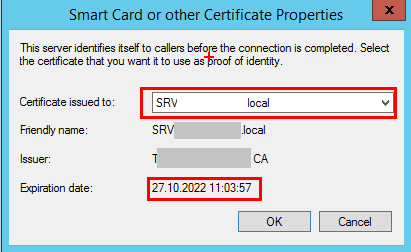
The certificate expiry date now shown should tie in to the one you just created:

Now also Windows 7 will connect to wireless network with no problem and not error event 🙂

That’s all fokls,

Windows port forwarding

November 3rd, 2020 No comments

I didn’t know that it’s possible in Windows TCP/IP stack make port forwarding. I knew it’s possible in Linux using iptables. In windows we have powerful tool called netsh.

Let’s have a example. Some service is listening on port TCP/10000. If I want to make this service listen on other port than TCP/10000 and there is no configuration to change I will use netsh to make it happen. Let’s look at listening ports on TCP/10000 and TCP/20000:

netstat before netsh

We can see there is no port listening on TCP/20000. Let’s make a magic and run command:

netsh interface portproxy add v4tov4 listenport=20000 listenaddress=0.0.0.0 connectport=10000 connectaddress=192.168.100.118

You cannot use loopback or 0.0.0.0 in connectaddress parameter. You can even use remote server IP address in connectaddress parameter.

Let’s look at netstat commands:

netstat after netsh

If your command doesn’t work, please, check if service called IP Helper is Running.

To see all configuration of portproxy settings just run following command:

netsh interface portproxy dump

netsh interface portproxy dump

To delete rule just run following command:

netsh interface portproxy delete v4tov4 listenport=20000 listenaddress=0.0.0.0

And that’s all folks,

Windows update restart problem

November 3rd, 2020 No comments

Once upon the time I had problem with Windows Update. All updates got downloaded and installed. When user click on button Restart Windows got error 0x80070005.

After couple minutes of debugging with Process Monitor I found out that process called explorer.exe had problem with accessing directory C:\Windows\System32\Tasks. That means that if you click on button Restart in Windows Update, Windows doesn’t just restart system. It creates Scheduled Task to reboot. Weird, but it does it this way.

So I have created GPO with security settings for directory C:\Windows\System32\Tasks and allow BUILTIN\Users have Modify rights to this directory.

And that’s the way we make it 🙂

Quickie: DFSR not working

April 27th, 2016 No comments

Problem: One of our customer has about 30 locations across our country and they wanted to use DFSR to replicate folder content to all locations. At each location there is one Hyper-V host running Windows Server 2012 R2 OS with DFSR installed. Each server has three disks – C:\, D:\ and E:\. I have configured DFS Replication in DFS console, replicated AD across environment, and … and nothing happened. DFSR didn’t do anything. It did NOT even create its own private folders in “System Volume Information” folder. No error event in Event viewer. DFSR was set to replicate folder on disk D:\ – didn’t work. I tried to replicate directory on E:\ disk – didn’t work. So I tried to replicate folder on C:\ disk – it did work 🙂

Solution: I enabled DFSR debug logging. There was no error mentioned, but what I noticed was that disks D:\ and E:\ had same serial numbers and also same volume IDs. It was weird. But after some discussion I found out that those two disks were “copied” and “cloned” in Hyper-V environment. So that’s why they had same serial numbers and volume IDs. I found out that it can be a problem. So I had to change volume ID using Microsoft utility VolumeID. After I changed one disk volume ID and rebooted system, DFSR started to work as expected.

So never do disk cloning. Or if you do, change at least volume ID for those disks so Windows services don’t get confused. Looking into this problem took me one and half day! Thank you Microsoft 🙂

Categories: Microsoft, Quickie, Windows Tags:

Server to Server Storage Replication

September 10th, 2015 1 comment

Today I played with Windows Server 2016 and its new feature called “Server to Server Storage Replication”. First of all I had to create two virtual server with Windows Server 2016 installed. I also created new domain. After all was done I installed two features on both servers using powershell:

Install-WindowsFeature -Name Storage-Replica -IncludeAllSubFeature -IncludeManagementTools -Restart

There is couple conditions that have to be met before you can use Server Storage Replication:

  • You must create two volumes on each enclosure: one for data and one for logs.
  • Log and data disks must be initialized as GPT, not MBR.
  • The two data volumes must be of identical size.
  • The two log volumes should be of identical size.
  • All replicated data disks must have the same sector sizes.
  • All log disks must have the same sector sizes.
  • The log volumes should use flash-based storage, such as SSD.
  • The data disks can use HDD, SSD, or a tiered combination and can use either mirrored or parity spaces or RAID 1 or 10, or RAID 5 or RAID 50.
  • The data volume should be no larger than 10TB (for a first test, we recommend no more than 1TB, in order to lower initial replication sync times).
  • The log volume must be at least 8GB and may need to be larger based on log requirements.

So I have created two new disks on both VMs. One was E: (DATA) 15 GB and other F: (LOGS) 10 GB.

Here is a list of all cmdlets which came with Storate Replication:

Storage Replication cmdlets

Let’s use Test-SRTopology to test if our VMs are ready for Storage Replication:

Test-SRTopology -SourceComputerName W2016-01 -SourceVolumeNames E: -SourceLogVolumeName F: -DestinationComputerName W2016-02 -DestinationVolumeNames E: -DestinationLogVolumeName F: -DurationInMinutes 10 -IntervalInSeconds 1 -ResultPath C:\tmp\

This cmdlet checks all the prerequirements and also test performance between servers:

Testing prerequirements

When everything is alright and working you get nice report. Now you are ready to create new Storate Replication Partnership and Group.

Let’s create SR partnership:

New-SRPartnership -SourceComputerName W2016-01 -SourceRGName RG01 -SourceVolumeName E: -SourceLogVolumeName F: -DestinationComputerName W2016-02 -DestinationRGName RG02 -DestinationVolumeName E: -DestinationLogVolumeName F:

When new partnership is created you can see the result in powershell:

Storage Replication Partnership

and it also created logfiles on log volume. Default size is 8GB. You can change it if you want based on report after Test-SRTopology:

Storage Replication LOGS

Other interesting thing is that data volume on destination server is disconnected/dismounted. So replicated data are not accessible. So let copy some files on Source volume. When I copied something on source data volume I noticed activity on network between nodes:

Store Replication Performance

We can also see some events saying about replication between nodes:

Store Replication Event

When we want to check if anything was copied on other side we need to switch replication other way around. It’s because replicated data disk is not accessible on destination server. This can look very odd, but replication is only one-way. If we want to switch replication direction we do this using powershell:

Set-SRPartnership -NewSourceComputerName W2016-02 -SourceRGName RG02 -DestinationComputerName W2016-01 -DestinationRGName RG01

There is also problem with low memory servers (2GB and less). They stop replicate because of low memory problem. I would expect some GUI console to this feature even Powershell is fine 🙂

If you want to see events from Storate Replication provider you can use following cmdlet:

Get-WinEvent -ProviderName Microsoft-Windows-StorageReplica | select timecre*,id,messa*

So let’s wait what will be in the final version of Windows Server 2016.

That’s all folks.

Upgrade na Windows 10

July 31st, 2015 No comments

Prisiel ten cas ked je Windows 10 vonku a vela ludi sa chysta na migraciu. Danu aktualizaciu z Windows 8.1 na Windows 10 som absolvoval aj ja. Ak sa vam nechce cakat na to, aby vas vas operacny system vyzval k danej aktualizacii, tak si mozete danu aktualizaciu vynutit. Vynutit sa da stiahnutim cca 20 MB suboru z tejto stranky.

Spusti sa vam sprievodca, ktory vam ponukne stiahnut data pre vytvorenie DVD/USB media alebo spustenie aktualizacie. Ja som sa rozhodol spustit aktualizaciu. Stahovalo to cely windows na C: disk:

Windows 10 downloading

A nasledne sa spustila aktualizacia. Lenze mna zarazilo nasledovne okno:

Windows 10 selection

Mozno cislo jedna bola vysedena a nebolo mozne ju vybrat. Microsoft, bohuzial, dovoli pouzit prvu moznost len pre Windowsy, ktore su v jazykoch: Anglicky, Brazilsky, Portugalsky a jednoducha Cinstina. Je to smutne ale je to tak. Skusal som zeditovat aj instalacku a jej nastavenia ale nic nepomohlo. Taktiez som skusal zmenit nastavenia Windowsu na inu ako Slovensku lokaciu a taktiez nepomohlo. Vyzera, ze pri stahovani aktualizacie si dana aplikacia stiahla slovensku verziu aktualizacie a aj instalacky:

Windows 10 Slovak

Takze neostavalo nic ine ako ist na tuto stranku a stiahnut anglicku verziu instalacky. Ked sa po stiahnuti dana instalacka pustila, tak vsetko slo ako po masle:

Windows 10 Eng

Vsetky nastavenia mi ostali. Par aplikacii bolo potrebne preinstalovat (VPN klienti) ale inak vsetko funguje ako ma a uz fungujem na Windows 10:

Windows 10 ver

Nemam odskusane ci pri instalacii anglickej verzie Windows 10 sa zanecha slovenske prostredie alebo treba este doinstalovat slovencinu.

Dufam, ze dany navod pomoze niekomu dalsiemu 🙂

Set account to expire on midnight

April 20th, 2015 No comments

Customer requested to force active directory accounts to expire on midnight or in the night and not during the day. So I’ve created following script to do so:

$UserList = Get-ADUser -Filter * -SearchBase "OU=USERS,DC=domain,DC=local" -Properties "DisplayName", "PasswordLastSet"
$Today = (Get-Date)
$MaxPasswdAge = (Get-ADDefaultDomainPasswordPolicy).MaxPasswordAge

ForEach ($User in $UserList)
   {
   $ExpireDate = ($User.PasswordLastSet) + $MaxPasswdAge
   $DaysToExpire = (New-TimeSpan -Start $Today -End $ExpireDate).Days
   If ($DaysToExpire -eq 1)
      {
      Set-ADUser -Identity $User -ChangePasswordAtLogon $true
      }
   }

#EOF

This script runs everyday at 23:55.

I found couple examples how to change pwdLastSet attribute on AD user’s object, but I don’t like that. I think this is cleared way to do so.

Have a nice day,

ShowIT 2014: Prezentacie

November 3rd, 2014 No comments
Categories: Microsoft, Windows Tags: ,

Microsoft Windows 7 Embedded and RDP 8.1

October 16th, 2014 4 comments

At one of our customers we deployed RDS RemoteApp server farm. Customer bought thin clients HP T510. When they connected to RemoteApp using Windows XP and Windows 7 on normal computers there were no problems with RemoteApps. When they connected to RemoteApp using Windows 7 Embedded on thin clients, they had problems with RemoteApp windows. RemoteApp windows were not displayed right. There was one extreme problem: User opened Microsoft Outlook, opened message and pressed Reply. Starte to type, but no characters were displayed. When you clicked on some part of the window all the text appeared. So RDP client sent all key strokes to RDP server, but RDP client didn’t refresh content of the window.

After some investigation I found out that Windows XP and Windows 7 had RDP client version 6.3.9600 (RDP 8.1 supported), but Windows 7 Embedded had only 6.2.9200 (RDP 8.0 supported). I’ve tried to google for some path or some HP image with RDP 8.1 for Windows 7 Embedded. No success. When you look on Remote Desktop Service Blog website, you can even find informaction that there is no RDP 8.1 for Windows Embedded.

But I found five hotfixes which are required for Windows 7 Emedded to have RDP client version 6.3.9600 (RDP 8.1 supported):

  • KB2574819-v2-x86
  • KB2592687-x86
  • KB2857650-x86
  • KB2830477-x86
  • KB2913751-x86

When you install all those updates you need to reboot machine and you will have nice RDP client version 6.3.9600 (RDP 8.1 supported):

rdp

That’s all for now,

Categories: Microsoft, Windows Tags:

Quickie: Hyper-V ready or not

September 30th, 2014 No comments

If you want to know if your computer is ready to host Hyper-V role you can check it quickly using old command systeminfo.exe with new feature. This new feature is in systeminfo.exe which is included in Windows 8 and higher and Windows Server 2012 and higher.

When you run it you can see the last output lines about Hyper-v Requirements:

System info hyper-v

That’s all for today,