Archive

Archive for April, 2013

Failing VMTools installation

April 29th, 2013 No comments

Problem

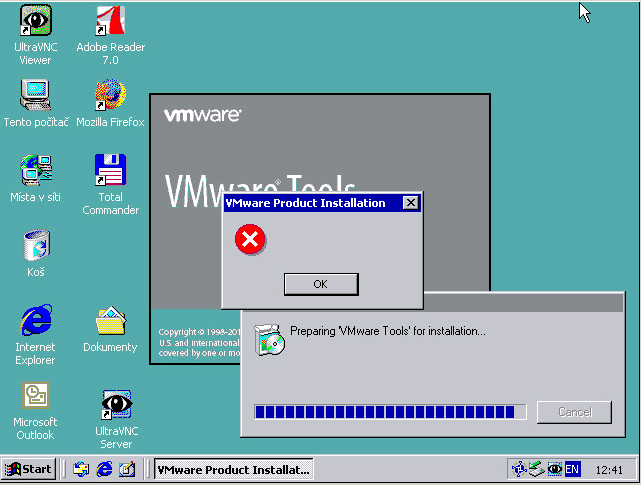
When I was installing VMTools on Windows Professional 2000 server I received weird error:

VMTools installation error

Server didn’t specify any error so I tried to dig into it.

Solution

When you do the installation of application, most of the time, this application installation unpacks its sources into temporary location. So I have looked into %temp% directory while error windows was displayed and I found one directory with actual date. So I have looked into it and I found couple files. One of them was called VMware Tools.msi. I tried to run VMware Tools.msi and it worked out.

I hope this saves someone time 🙂

Quickie: How to clear all port statistics on Brocade switches

April 23rd, 2013 5 comments

During one migration I wanted to clear out all port statistics on Brocade switch. I couldn’t find any command which would clear statistics for all port and I had to do it one by one 🙁

portstatsclear 0
portstatsclear 1
portstatsclear 2
portstatsclear 3
portstatsclear 4
portstatsclear 5
portstatsclear 6
portstatsclear 7
portstatsclear 8
portstatsclear 9
portstatsclear 10
portstatsclear 11
portstatsclear 12
portstatsclear 13
portstatsclear 14
portstatsclear 15

So I posted this article so I can copy and paste commands to the switch 🙂


Categories: Quickie Tags: , ,

Problems with CPU in incompatible error during VMWare vMotion

April 23rd, 2013 14 comments

One of our users reported problems with vMotion after firmware upgrade of IBM server. Firmware were upgraded using BOMC (utility to create ISO images to upgrade IBM server to the lastest versions available).

After upgrade user was not able to do vMotion. They received following error:

Host CPU is incompatible with the virtual machine’s requirements at CPUID level 0x1 register ‘ecx’.

CPU is incompatible

After couple minutes of googling I found out following official articles:

Based on information there is change when you do firmware upgrade. Sometime (from some version) AES feature is Enabled and sometime is disabled. This setting cannot be changed in BIOS and this is really sad. So let’s look at the way you can change it.

In second mentioned article IBM suppose to download some prepared ISO image called BoMC-2.20-uEFI-AesEnable-to-enabled-vmotion-fix.iso. But I couldn’t find this ISO image. So I had to use other way around. I downloaded IBM Advanced Setting Utility. I downloaded and installes version for Windows 64b. You need your RSA card to be accessible through network. Then you can run following command to check actual value:

asu64.exe showvalues UEFI.AesEnable –host RSA_IP_ADDRESS –user RSA_USER –password RSA_PASSWORD

AES showvalue

You can check it on all ESX servers. To decide whether feature should be enabled or disabled you this article. We need to change it to the same setting using following command:

asu64.exe set UEFI.AesEnable Disable –host RSA_IP_ADDRESS –user RSA_USER –password RSA_PASSWORD

set AES

When values are the same on all ESX server you are able to do vMotion. I was kinda mad on IBM, because I would preffer to change this value in BIOS instead of some application.

Fun: Internet Explorer 6 or 10?

April 19th, 2013 No comments

I was browsing at Brocade website lot last couple days, but when I accessed it from my Internet Explorer 10 I received following warning:


IE10 or IE 6


I thin Internet Explorer is out for a quite time, so Broacade had time to “implement” it on its website 🙂


ESET Smart Security makes problems when migrating computers between domains

April 13th, 2013 6 comments

I was facing weird problem with computers when I was trying to migrate computer accounts between two active directory domains. When you use ADMT to migrate computer accounts, ADMT installs ADMT Agent on computer and this ADMT Agent makes all changes during computer account migration.

Problem

When there was computer with ESET Smart Security installed I had following problems. First problem was that migration failed and in ADMT log file I received following error:

2013-04-12 16:29:54 The Active Directory Migration Tool Agent will be installed on CENTRALA.DOMAIN.LOCAL
2013-04-12 16:29:59 WRN1:0000 Could not open SCManager on \\CENTRALA.DOMAIN.LOCAL : GetLastError() returned 5
2013-04-12 16:29:59 WRN1:7015 Failed to connect to the service control manager on \\CENTRALA.DOMAIN.LOCAL, rc=5   Access is denied.
2013-04-12 16:29:59 ERR2:7006 Failed to install agent on \\CENTRALA.DOMAIN.LOCAL, rc=5   Access is denied.

 So error number 5 means I have no rights somewhere. After reading couple pages of ADMT documentation I found out that ADMT installs ADMT Agent using Admin share called ADMIN$. So I tried to access ADMIN$ share on computer CENTRALA.DOMAIN.LOCAL. I received following error:

Problem with NETLOGON service

I have never seen such an error:”An attempt was made to logon, but the network logon service was not started.”. I checked services on computer CENTRALA.DOMAIN.LOCAL and Windows was right. Service NETLOGON was Disabled!

Solution

I had to temporary turn off ESET Smart Security (I would preffer not use this software at all 🙂 ) and also enable and start service NETLOGON.

Conclusion

Every computer I migrated and had installed ESET Smart Security had the same problems. So IMHO ESET Smart Security has changed service NETLOGON to Disabled. I really don’t understand why this is necessary, but I think it’s not right way “smart security product” should protect your computer.

I found one article about disabling NETLOGON service as security practice. It’s maybe good security practice, but there is also pitfall stated on websie:

If you disable the NetLogon service, a workstation no longer functions reliably as a domain member. This setting may be appropriate for some computers that do not participate in domains. However, it should be carefully evaluated before deployment.

I’m wondering what other functions are not available when NETLOGON disabled (besides not accessible ADMIN$ share) on domain member computer.

I hope this helps someone 🙂

Exchange 2010 and aditional Active Directory sub-domain/child domain

April 13th, 2013 No comments

We had Active Directory domain called DOMAIN.LOCAL. There was Exchange 2010 installed. It was fully functional. After some time I added new sub-domain/child domain SUB.DOMAIN.LOCAL and migrated users with mailboxes from DOMAIN.LOCAL to SUB.DOMAIN.LOCAL.

Problem

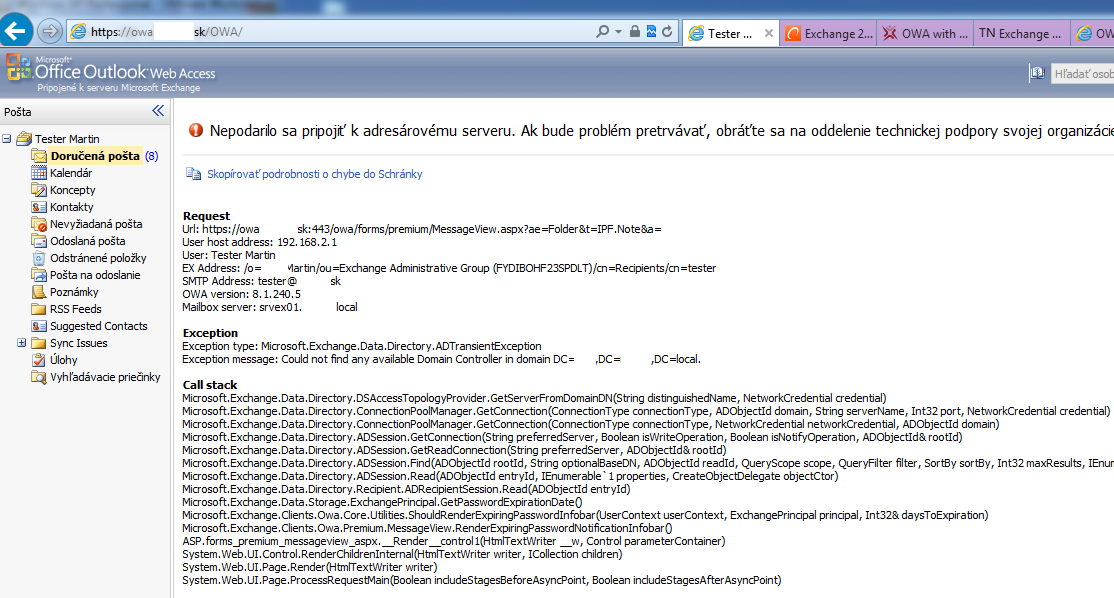
When users from SUB.DOMAIN.LOCAL logged into OWA they received following view:

OWA Error

Error stated: Exception message: Could not find any available Domain Controller in domain DC … so problem is probably in the way Exchange locates domain controllers. When users clicked F5 or refreshed website, he could see his e-mails normally.

There was also event 2130 logged on Exchange server saying Exchange Active Directory Provider could not find an available domain controller in the domain.

Solution

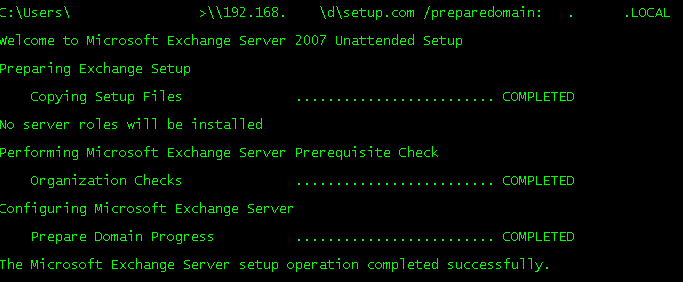
When you want to install Exchange into Active Directory domain, you need to prepare forest and also domain before you install it. You use setup.com (from installation DVD of Exchange) with some switches (for example /PrepareSchema, /PrepareAD,…). So new added domain SUB.DOMAIN.LOCAL to existing AD Forest was not prepared for Exchange implementation. I ran following command setup.com /PrepareDomain:SUB.DOMAIN.LOCAL:

PrepareDomain

If you have more then one domain to prepare for Exchange, you can use command setup.com /PrepareAllDomains.

The best way to run /PrepareDomain or /PrepareAllDomains is:

  • to be logged domain controller with role Schema Admin
  • to be member of Enterprise Admins group
  • to be member of Schema Admins group

I hope you will not make same mistake as I did 🙂


Exchange read-only mailbox rights

April 11th, 2013 1 comment

Couple of days I’ve got question from my friend if there is way to setup Exchange mailbox to be Read-only for other users in company. I never needed it, because when someone else needed to access other’s mailbox, I just set FullAccess rights on mailbox and everythin worked fine.

Testing scenario

Exchange 2010

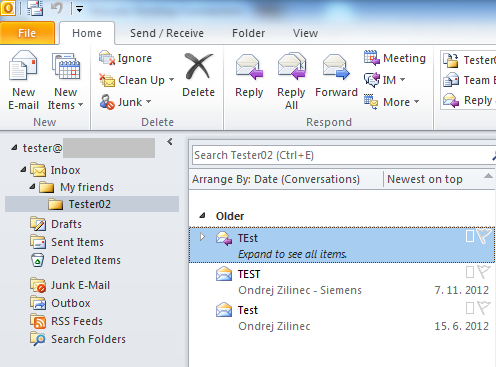
Tester user called Tester with following content of mailbox:

Tester mailbox

Tester user called Tester02 wich wants to access whole mailbox of user Tester, but Read-only.

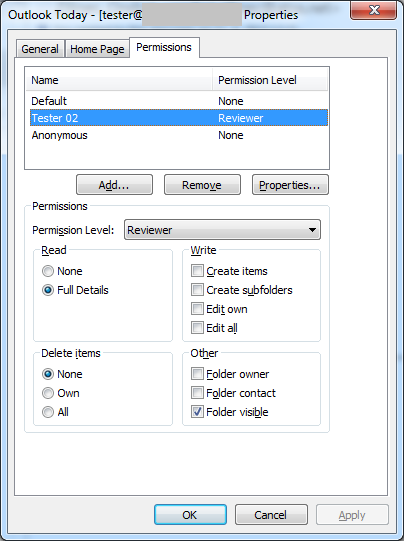
When I set Reviewer for user Tester02 on mailbox Tester under Outlook:

Reviewer permissions

Problem

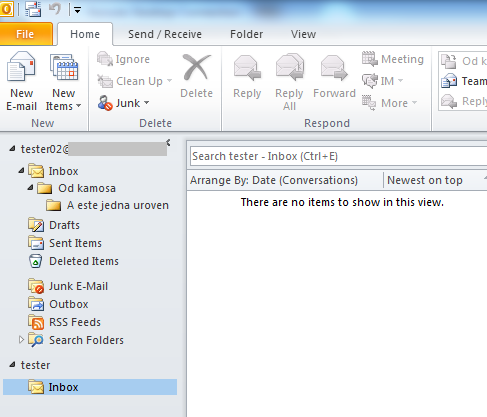
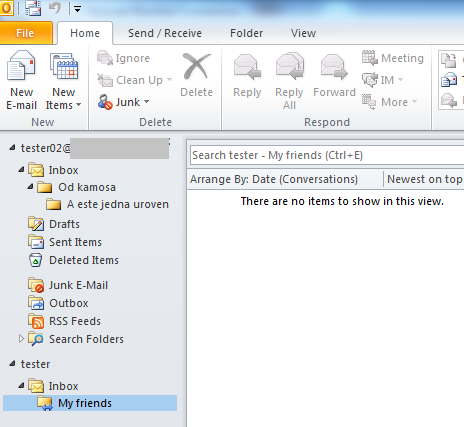
When I connect Tester’s mailbox into Tester02’s Outlook profile I can see following:

Inbox view

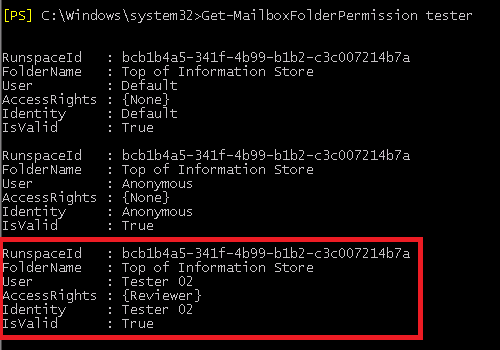
So I can see only Inbox. I don’t see any folder underneath it. We can check this permissions also using Powershell:

Get-MailboxFolderPermission

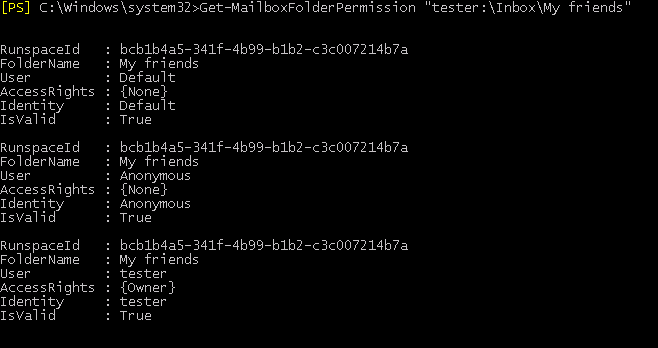
When we look on mailbox folder permissions underneath Inbox, for example “Inbox\My friends” folder, we can see following:

Permission on subfolder

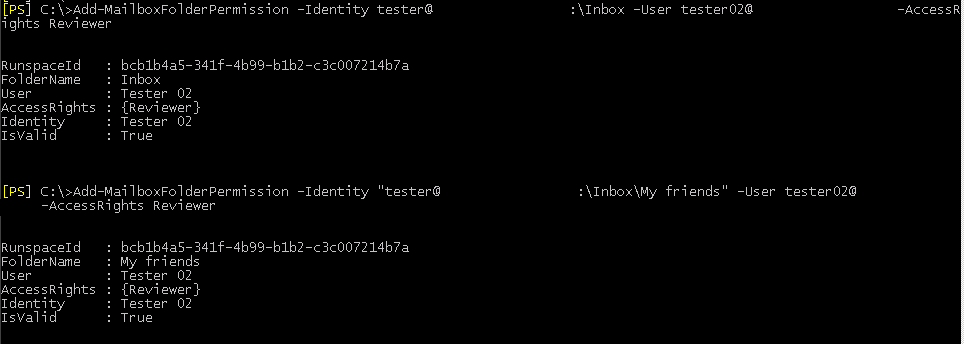
This means that mailbox folder permissions are not inherited. So we can set permission per folder. So let’s test to add permission to folder Inbox and subfolder “My friends”:

Set-Folder Permissions

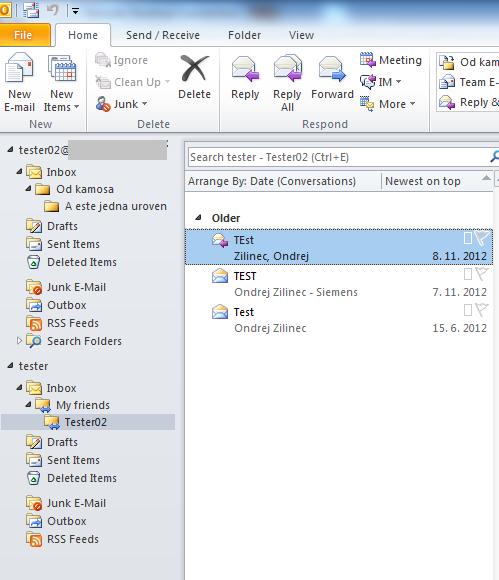
and now we can see also subfolders under account Tester02:

Accessible subfolders

This means that using Outlook or powershell commandlet Add-MailboxFolderPermission can set permissions only on one folder and these settings are not inherited! This is really weird. I couldn’t find any setting to allow inheritance.

Another way to set permissions of mailbox folders is set permissions on whole mailbox. This can be set by users which have rights to manage exchange mailboxes. Let’s look on powershell cmd-let Add-MailboxPermission. This cmdlet allows you to set just following access rights: FullAccess, SendAs, ExternalAccount, DeleteItem, ReadPermision, ChangePermision and ChangeOwner. Neither one of these rights define Read-only access to mailbox.

Solution

So there is no easy way to share whole mailbox between users in read-only manner. Only way I can think of is to run some powershell script. For example:

Add-MailboxFolderPermission tester -User tester02 -AccessRights Reviewer


ForEach($folder in (Get-MailboxFolderStatistics -Identity tester) )

{

$fname = “tester:” + $folder.FolderPath.Replace(“/”,”\”);

Add-MailboxFolderPermission $fname -User tester02 -AccessRights Reviewer

}

where “tester” is account with shared mailbox and “tester02” is account which want to access shared mailbox.

After this powershell commands are done, Tester02 can see Tester’s mailbox:


Shared mailbox accessible


But when user Tester creates new folder in his mailbox, user Tester02 will not see it unless user Tester sets permissions on new mailbox folder.

I hope guys from Microsoft will solve this issue in next release of Exchange. 🙂


Deploying Remote Assistance

April 11th, 2013 4 comments

When I come to customers I most of the time see some third party management tools installed on client workstations (for example VNC). These tools are used by administrators to manage workstations remotely. They are able to see user’s desktop and solve a problem. Administrators thinks the only tool to manage user’s desktop is to connect to workstation with RDP. Problem with RDP is that user and admin cannot see same screen and just one ot them can work on actual desktop.

Microsoft implemented Remote Assistance feature to Windows since Windows XP. It’s technology based on shadowing technology used in Terminal Services/RDS on server based OS. It is great tool to implement (or just configure) in corporate environment. It can be also used in home environment. There are two modes how to make connection:

  • Initiated by person which needs help (home/corporate use)
  • Initiated by helping person (mostly by professional use) – called Easy Connect

When person which needs help wants to send request for help to helping person, he can do it using following ways:

  • Using Microsoft Messenger
  • Creating special kind of file
  • Sending mail

I will not describe how to use Remote Assistance in home environment. I will focus on corporate use. Most of the time you have some administrators for workstations and, of course, workstation users. Workstation users always have a problems they cannot handle and we, as a admins, need to see a problem which user sees and need to solve a problem. Let’s work with environment where Active Directory domain is implemented. We will implement two methods of providing help to users.

You can configure Remote Asistance on computers in domain using GPO. Configure if you users can send invitations for Remote Assitance (called Solicited Remote Assistance) (Computer Configuration — Policies — Administrative Templates — System — Remote Assistance — Solicited Remote Assistance):
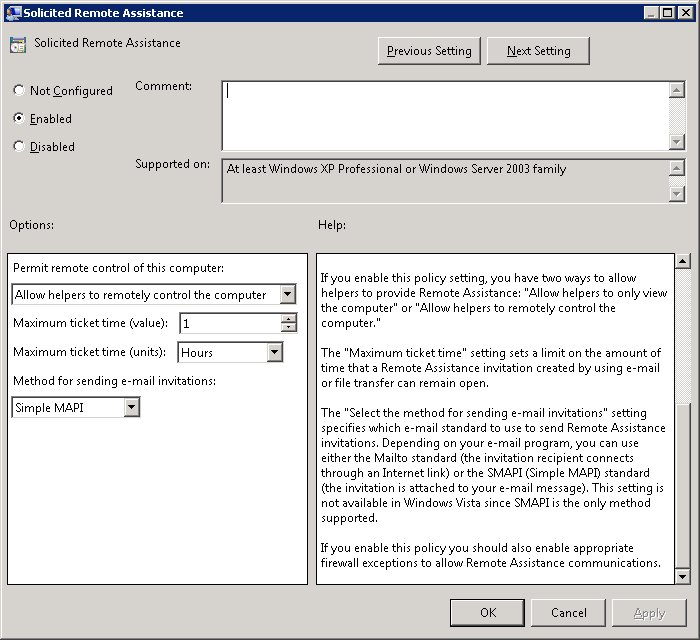
Solicited Remote Assistance

and also if someone can offer help to users (Computer Configuration — Policies — Administrative Templates — System — Remote Assistance — Offer Remote Assistance):
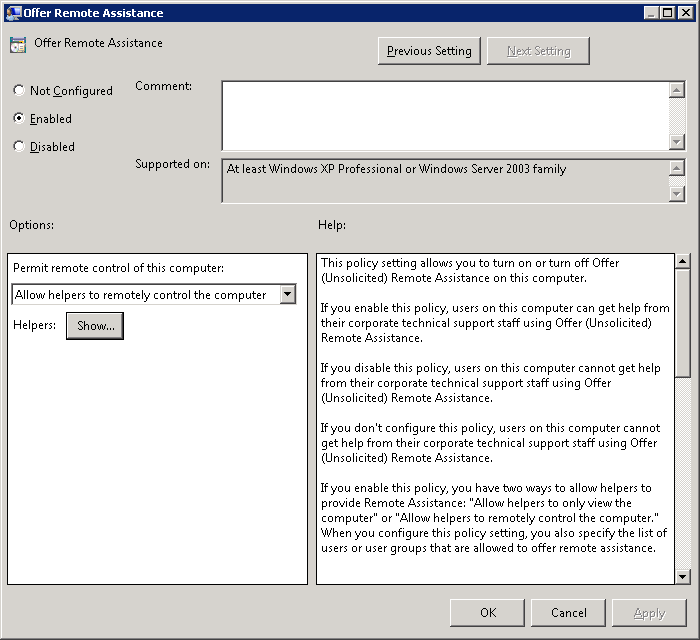
Offer Remote Assistance

Don’t forget to specify users/groups which can send you offer for Remote Assistance by clickin on button “Show…” in this GPO settings:
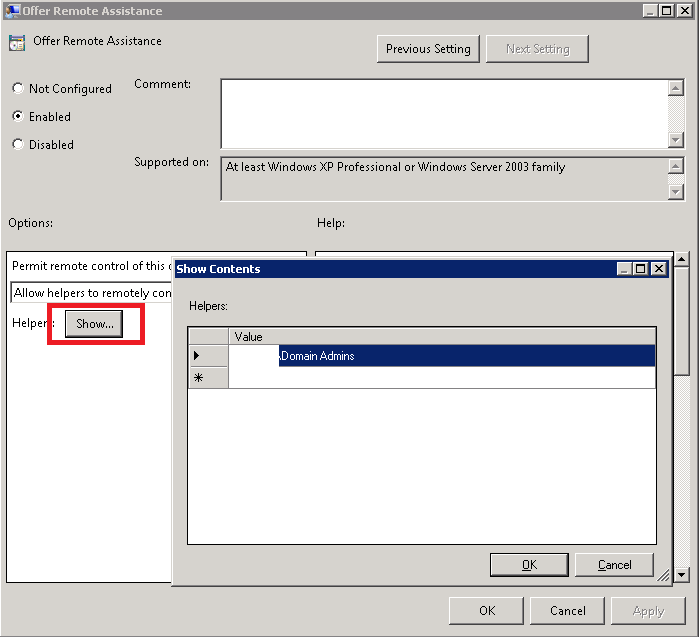
RA Offer Group

You can configure more options in GPO:

  • Allow only Vista or later connections – this feature enables improved encryption of invitations
  • Turn on session logging – enables logging of Remote Assistance sessions. Log files are located under user’s Documents folder under Remote Assistance
  • Turn on bandwidth optimization – you can set optimization of sessions
  • Customize Warning Messages – you can custom warning messages before connecting and before sharing control

When you apply GPO you can use Remote Assistance.

Workstation users can ask for help by running Windows Remote Assistance (msra.exe):
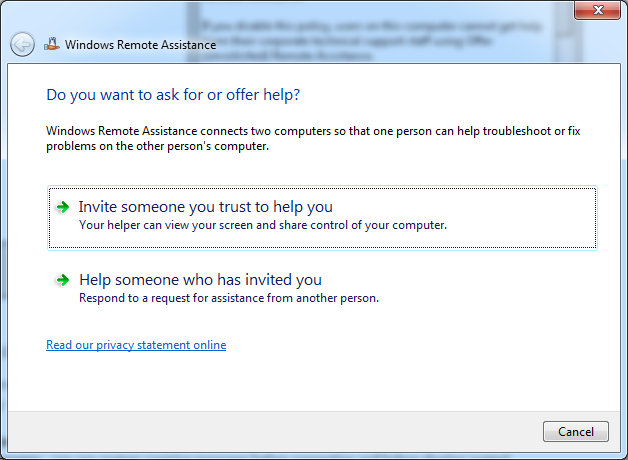
 

Run Windows Remote Assistance


Click “Invite someone you trust to help you”:
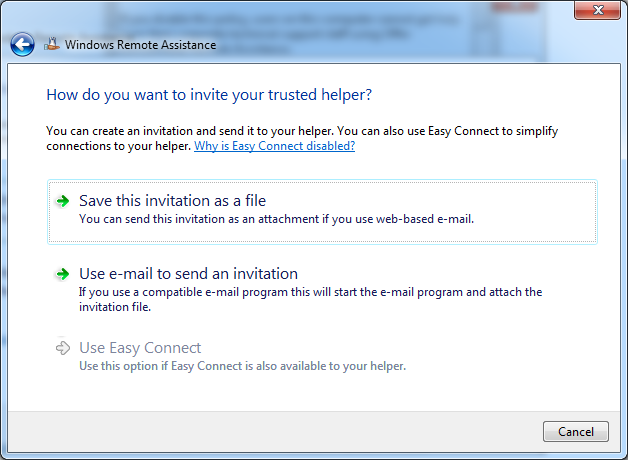
 

RA Invitate


And you can choose method how you want invite helper:

  • Save this invitation as file – This will save your invitation information into file and you can distribute this file to your administrator. There can be some file share or you can send it as attachement to your administrator.
  • Use e-mail to send an invitation – This option is enabled when you have mail client installed (Outlook). It will open up New message in mail client and fill required fields. It will also attach generated invitation file to mail message.
  • Use Easy Connect – This option helps users to select from available helpers. This options is nice, but it depends on IPv6 tunneling interface Teredo. You need to have IPv6 enabled on computers, Teredo interface has to be in Enterprise mode and service Peer Name Resolution Protocol.

Use Easy Connect

Just some remarks to setup of Teredo interface:

  • You can check the status of Teredo interface by running command netsh int teredo show state. If you see Type set to “Client” then Easy Connect won’t work. You should change it to type “Enterprise Client”. You can do it in two ways. One is by running command netsh int teredo set state type=enterpriseclient and other is by GPO (Computer Configuration — Policies — Administrative Templates — Network — TCPIP Settings — IPv6 Transition Technologies — Teredo State set toEnterprise Client).
  • You can check if Peer Name Resolution Protocol works correctly by running command netsh p2p pnrp cloud show list. You should see status Active (rather  than Virtual and Alone) in line named Global_.
  • Your router should support UPnP technology if you are going to support machines behind NAT.

If you are admin and you want to provide help to user, the easiest way is to run msra.exe /offerra:
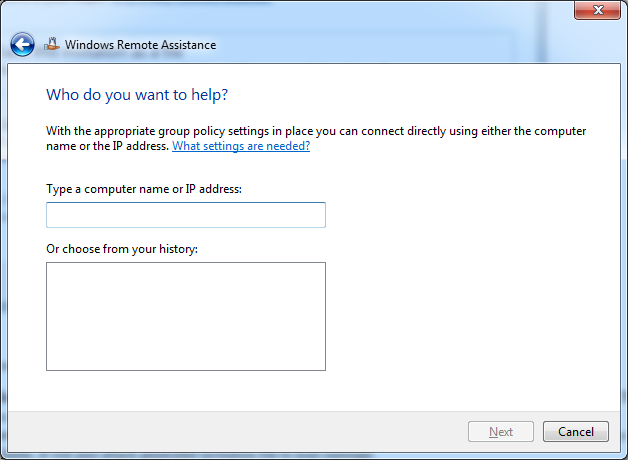
 

Offer Remote Assistance


type IP address/name of computer which needs help and you can manage it. When you offer assistance, user is asked to approve your assistance:
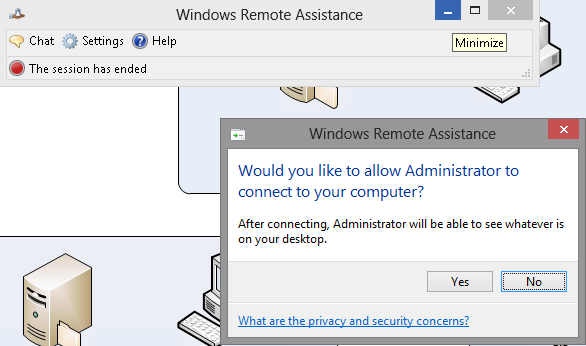
 

Input assistance


This opens Read-only view of desktop. If administrator wants to get full control of desktop, he needs to request for it by clicking button “Request Control” in his Remote Assistance window (just for Robert Švec – upper left corner 🙂 ):
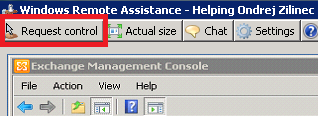
 

Request control


From now this is very intuitive to use. This feature is nice to use and you don’t have to install any 3rd party solutions.

If you want to use Remote Assistance on Windows Server OS, you need to install feature:

Windows Server 2008 R2:

ServerManagerCmd.exe -install Remote-Assistance

Windows Server 2012:

Install-WindowsFeature Remote-Assistance


You also need to create some exceptions on firewall:

  • If you want to offer assistance, computers which need help have to have following exceptions:
    • Windows Vista and later
      • Port 135:TCP
        %WINDIR%\System32\msra.exe
        %WINDIR%\System32\raserver.exe
    • Windows XP with Service Pack 2 (SP2) and Windows XP Professional x64 Edition with Service Pack 1 (SP1)
      • Port 135:TCP
        %WINDIR%\PCHealth\HelpCtr\Binaries\Helpsvc.exe
        %WINDIR%\PCHealth\HelpCtr\Binaries\Helpctr.exe
        %WINDIR%\System32\Sessmgr.exe
    • Windows Server 2003 with Service Pack 1 (SP1)
      • Port 135:TCP
        %WINDIR%\PCHealth\HelpCtr\Binaries\Helpsvc.exe
        %WINDIR%\PCHealth\HelpCtr\Binaries\Helpctr.exe
        Allow Remote Desktop Exception
  • If you use Easy Connect, you need to enable PNRP port UDP 3540

You cannot manade Windows 7 computers from Windows XP computers. You can though oposite way (thanks to Roman Kučerák for remark).

From now I will try to convince administrators to use Remote Assistance in situations they will need it.

I hope I covered everything I wanted 🙂
 

Quickie: Missing WDS/RIS Extension in ADUC on Windows 2008 R2 and Windows Server 2012

April 10th, 2013 2 comments

At one customer I upgraded domain controller into Windows Server 2008 R2. This customer use two RIS (Windows 2003) and one WDS (Windows 2008 R2) servers to deploy OS images.

Problem

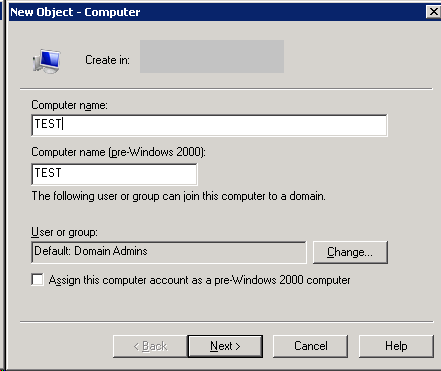
Customer complained that before upgrade of domain controllers to Windows Server 2008 R2, he could provision computer accounts for RIS/WDS. After domain controllers were upgraded user  creates Computer account in ADUC (Active Directory Users and Computers), but he sees only one screen to define computer name.

Create new account

He couldn’t define GUID/UUID and couldn’t specify remote installation server.

Solution

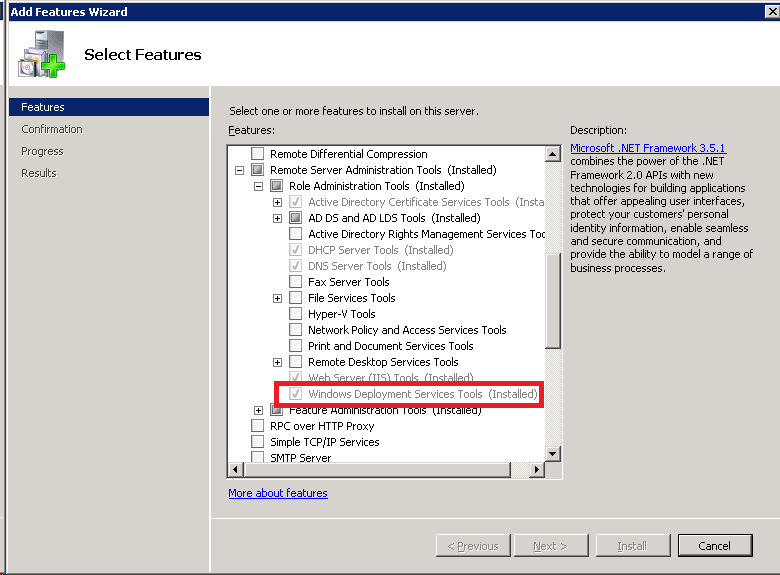
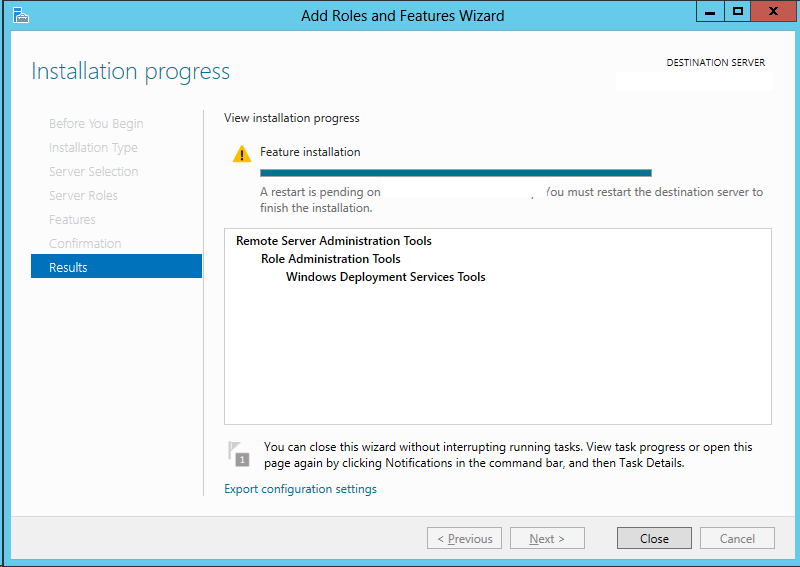
To be able to prestage computer accounts for RIS/WDS server you need to install Feature called Remote Server Administration Tools — Role Administration Tools — Windows Deployment Services Tools.

Windows Server 2008 R2:

WDS Tools

Windows Server 2012:

Install feature

Or by using PowerShell in Windows Server 2012:

Install-WindowsFeature WDS-AdminPack

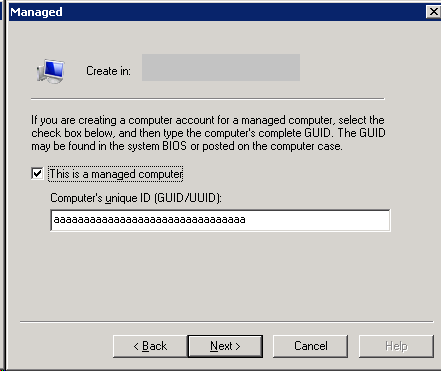
When you install this feature you can define GUID/UUID:

Define GUID/UUID

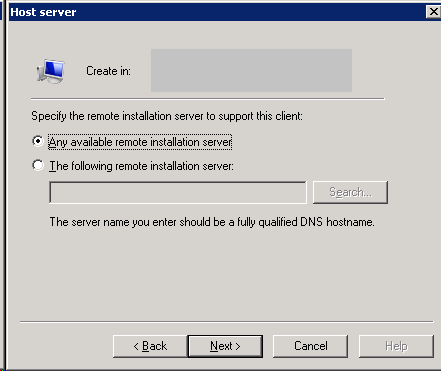
and also specify remote installation server:

Define remote installation server

That’s all,