Deploying Remote Assistance

April 11th, 2013 4 comments

When I come to customers I most of the time see some third party management tools installed on client workstations (for example VNC). These tools are used by administrators to manage workstations remotely. They are able to see user’s desktop and solve a problem. Administrators thinks the only tool to manage user’s desktop is to connect to workstation with RDP. Problem with RDP is that user and admin cannot see same screen and just one ot them can work on actual desktop.

Microsoft implemented Remote Assistance feature to Windows since Windows XP. It’s technology based on shadowing technology used in Terminal Services/RDS on server based OS. It is great tool to implement (or just configure) in corporate environment. It can be also used in home environment. There are two modes how to make connection:

  • Initiated by person which needs help (home/corporate use)
  • Initiated by helping person (mostly by professional use) – called Easy Connect

When person which needs help wants to send request for help to helping person, he can do it using following ways:

  • Using Microsoft Messenger
  • Creating special kind of file
  • Sending mail

I will not describe how to use Remote Assistance in home environment. I will focus on corporate use. Most of the time you have some administrators for workstations and, of course, workstation users. Workstation users always have a problems they cannot handle and we, as a admins, need to see a problem which user sees and need to solve a problem. Let’s work with environment where Active Directory domain is implemented. We will implement two methods of providing help to users.

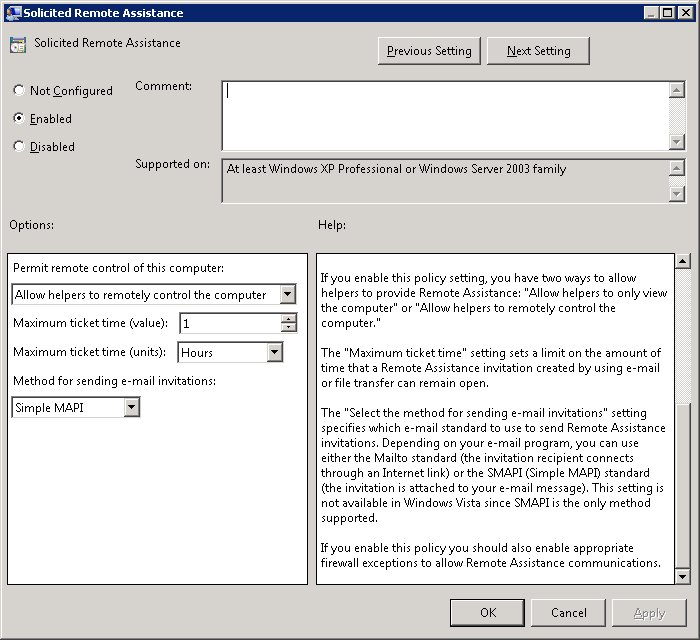
You can configure Remote Asistance on computers in domain using GPO. Configure if you users can send invitations for Remote Assitance (called Solicited Remote Assistance) (Computer Configuration — Policies — Administrative Templates — System — Remote Assistance — Solicited Remote Assistance):

Solicited Remote Assistance

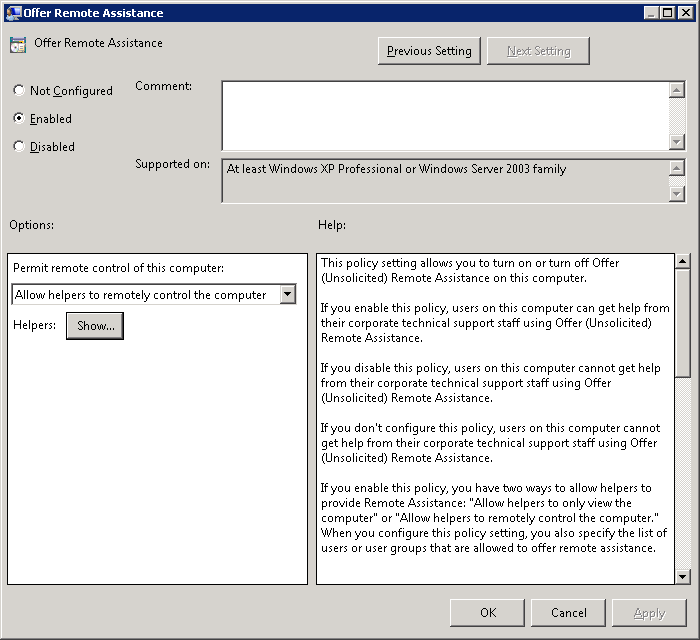
and also if someone can offer help to users (Computer Configuration — Policies — Administrative Templates — System — Remote Assistance — Offer Remote Assistance):

Offer Remote Assistance

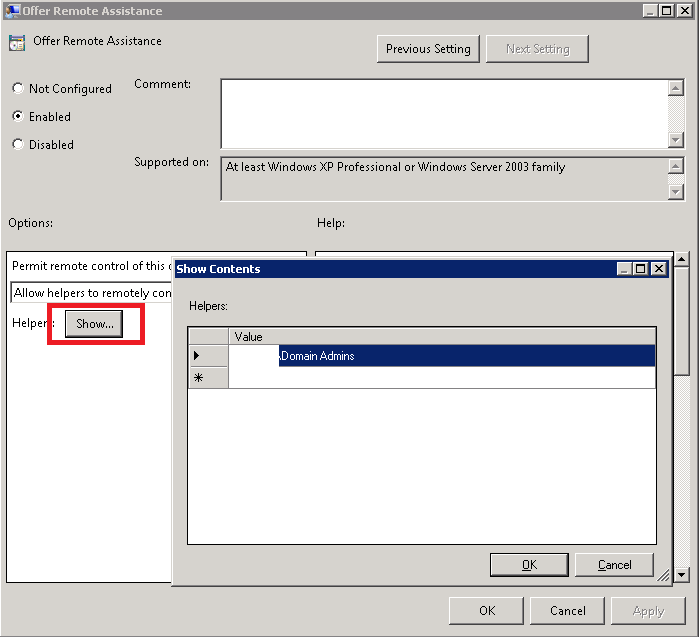
Don’t forget to specify users/groups which can send you offer for Remote Assistance by clickin on button “Show…” in this GPO settings:

RA Offer Group

You can configure more options in GPO:

  • Allow only Vista or later connections – this feature enables improved encryption of invitations
  • Turn on session logging – enables logging of Remote Assistance sessions. Log files are located under user’s Documents folder under Remote Assistance
  • Turn on bandwidth optimization – you can set optimization of sessions
  • Customize Warning Messages – you can custom warning messages before connecting and before sharing control

When you apply GPO you can use Remote Assistance.

Workstation users can ask for help by running Windows Remote Assistance (msra.exe):


Run Windows Remote Assistance


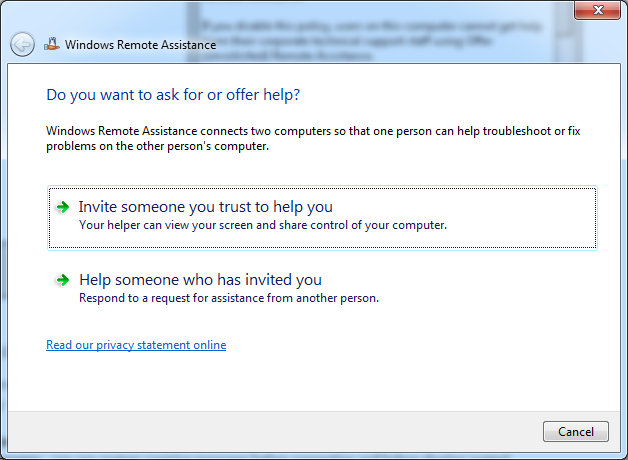
Click “Invite someone you trust to help you”:


RA Invitate


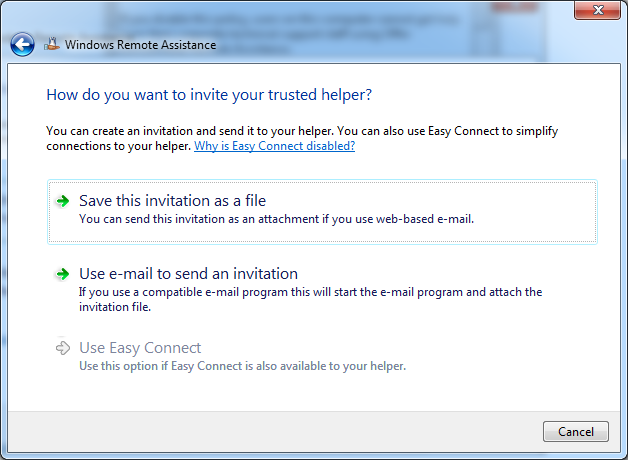
And you can choose method how you want invite helper:

  • Save this invitation as file – This will save your invitation information into file and you can distribute this file to your administrator. There can be some file share or you can send it as attachement to your administrator.
  • Use e-mail to send an invitation – This option is enabled when you have mail client installed (Outlook). It will open up New message in mail client and fill required fields. It will also attach generated invitation file to mail message.
  • Use Easy Connect – This option helps users to select from available helpers. This options is nice, but it depends on IPv6 tunneling interface Teredo. You need to have IPv6 enabled on computers, Teredo interface has to be in Enterprise mode and service Peer Name Resolution Protocol.

Use Easy Connect

Just some remarks to setup of Teredo interface:

  • You can check the status of Teredo interface by running command netsh int teredo show state. If you see Type set to “Client” then Easy Connect won’t work. You should change it to type “Enterprise Client”. You can do it in two ways. One is by running command netsh int teredo set state type=enterpriseclient and other is by GPO (Computer Configuration — Policies — Administrative Templates — Network — TCPIP Settings — IPv6 Transition Technologies — Teredo State set toEnterprise Client).
  • You can check if Peer Name Resolution Protocol works correctly by running command netsh p2p pnrp cloud show list. You should see status Active (rather  than Virtual and Alone) in line named Global_.
  • Your router should support UPnP technology if you are going to support machines behind NAT.

If you are admin and you want to provide help to user, the easiest way is to run msra.exe /offerra:


Offer Remote Assistance


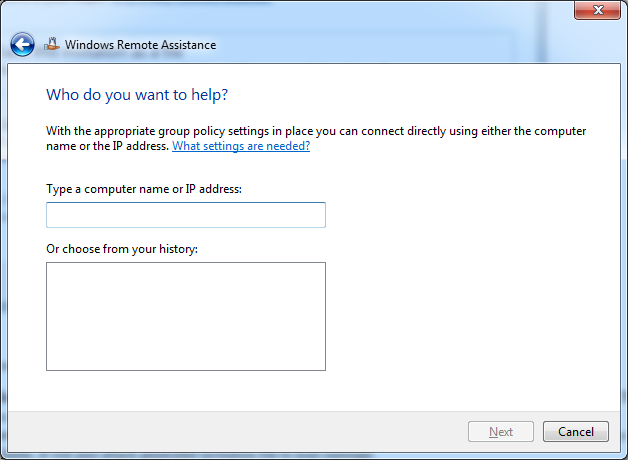
type IP address/name of computer which needs help and you can manage it. When you offer assistance, user is asked to approve your assistance:


Input assistance


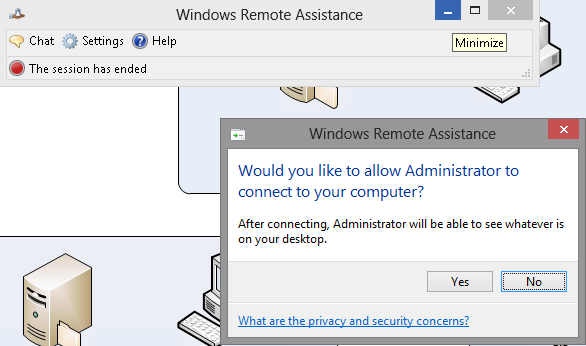
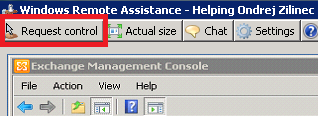
This opens Read-only view of desktop. If administrator wants to get full control of desktop, he needs to request for it by clicking button “Request Control” in his Remote Assistance window (just for Robert Švec – upper left corner 🙂 ):


Request control


From now this is very intuitive to use. This feature is nice to use and you don’t have to install any 3rd party solutions.

If you want to use Remote Assistance on Windows Server OS, you need to install feature:

Windows Server 2008 R2:

ServerManagerCmd.exe -install Remote-Assistance

Windows Server 2012:

Install-WindowsFeature Remote-Assistance


You also need to create some exceptions on firewall:

  • If you want to offer assistance, computers which need help have to have following exceptions:
    • Windows Vista and later
      • Port 135:TCP
        %WINDIR%\System32\msra.exe
        %WINDIR%\System32\raserver.exe
    • Windows XP with Service Pack 2 (SP2) and Windows XP Professional x64 Edition with Service Pack 1 (SP1)
      • Port 135:TCP
        %WINDIR%\PCHealth\HelpCtr\Binaries\Helpsvc.exe
        %WINDIR%\PCHealth\HelpCtr\Binaries\Helpctr.exe
        %WINDIR%\System32\Sessmgr.exe
    • Windows Server 2003 with Service Pack 1 (SP1)
      • Port 135:TCP
        %WINDIR%\PCHealth\HelpCtr\Binaries\Helpsvc.exe
        %WINDIR%\PCHealth\HelpCtr\Binaries\Helpctr.exe
        Allow Remote Desktop Exception
  • If you use Easy Connect, you need to enable PNRP port UDP 3540

You cannot manade Windows 7 computers from Windows XP computers. You can though oposite way (thanks to Roman Kučerák for remark).

From now I will try to convince administrators to use Remote Assistance in situations they will need it.

I hope I covered everything I wanted 🙂


Quickie: Missing WDS/RIS Extension in ADUC on Windows 2008 R2 and Windows Server 2012

April 10th, 2013 2 comments

At one customer I upgraded domain controller into Windows Server 2008 R2. This customer use two RIS (Windows 2003) and one WDS (Windows 2008 R2) servers to deploy OS images.

Problem

Customer complained that before upgrade of domain controllers to Windows Server 2008 R2, he could provision computer accounts for RIS/WDS. After domain controllers were upgraded user  creates Computer account in ADUC (Active Directory Users and Computers), but he sees only one screen to define computer name.

Create new account

He couldn’t define GUID/UUID and couldn’t specify remote installation server.

Solution

To be able to prestage computer accounts for RIS/WDS server you need to install Feature called Remote Server Administration Tools — Role Administration Tools — Windows Deployment Services Tools.

Windows Server 2008 R2:

WDS Tools

Windows Server 2012:

Install feature

Or by using PowerShell in Windows Server 2012:

Install-WindowsFeature WDS-AdminPack

When you install this feature you can define GUID/UUID:

Define GUID/UUID

and also specify remote installation server:

Define remote installation server

That’s all,

What’s new in WSUS in Windows Server 2012

March 27th, 2013 No comments

Installation of WSUS on Windows Server 2012

I started to install WSUS service on Windows Server 2012. I selected to install Windows Internal Database as store of WSUS metadata.

WSUS installation

I selected to store updates on local C:\ drive (it’s just testing machine):

Store updates localy

After first run on Windows Server Update Services management tool WSUS asks again if I want to store updates locally or not:

WSUS complete installation

When I click Run, post-installation starts to run:

Post-installation

And I received Post-installation “notification” 🙂 in Microsoft word it means I have a problem (Failed to restart the current database. The currecnt database is switched to master):

Post-installation error

So if computer has problem with restarting database, let’s restart service. Didn’t help 🙂 Let’s restart whole computer. Didn’t help either. So the problem will be somewhere else.

I tried to install WSUS from scratch. I uninstalled WSUS and also Windows Internal Database feature. I also deleted data for Windows Internal Database from directory C:\Windows\WID. Then I installed WSUS with all dependecies – WID, IIS, …

Now I’m getting different error:

WSUS illegal character in path

Problem was backslash in input window for defining directory to store updates 😀 This path was predefined by wizard and it was wrong. This is really funny 🙂

So after reinstallation of WSUS and WID and defining “correct” path to update store directory (without backslash on the end 🙂 ) everything looks to be done correctly:

Post-installation done

Let click Close and look what’s new in WSUS. First we need to configure WSUS and I did it using WSUS Wizard. I don’t see any news in this Wizard compared to older one.

Exploring WSUS

I haven’t notice any news in WSUS mmc console. I always use client side group targeting. This feature allows you to create groups of computers in WSUS structure. It can be used to target updates specified for testing to just group of computers and so on. To make this working you need to set client side of group targeting by defining name of Group and also you need to create new Computer Group in WSUS structure. What I always forget it to create these Computer Groups in WSUS structure 🙂 I would love to see some option to allow WSUS to create these Computer Groups automatically. But this didn’t happend of this version of WSUS.

I think the most powerful thing Microsoft added into WSUS is support for Powershell cmd-lets. Most of the time WSUS settings about update Classifications and update Products are same from customer to cutosmer, so you can automate this settings using cmd-lets Get-WsusClassification, Set-WsusClassification, Get-WsusProduct and Set-WsusProduct.

To get some information about WSUS Server it selft you can use cmd-let Get-WsusServer:

Get-WsusServer

There are more interesting cmd-lets. One is Get-WsusComputer which prints out some more information about computer reported into WSUS:

Get-WsusComputer

Get-WsusComputer has lot of ability to filter out computers on some conditions. Failed, Needed, …

To manage updates from powershell you can use cmd-lets Get-WsusUpdate, Approve-WsusUpdate and Deny-WsusUpdate. You can for example approve all updates that are Unapproved and FailedOrNeeded:

Get-WsusUpdate -Classification All -Approval Unapproved -Status FailedOrNeeded | Approve-WsusUpdate -Action Install -TargetGroupName “All Computers”

And the last cmd-let I really love, because I can make scheduled task to run Clean-up Wizard. Cmd-let is Invoke-WsusServerCleanup. You can do every cleanup task you can make from GUI.

Conclusion

I don’t think there is too much to improve on WSUS, but little powershell support for WSUS is handy.

Quickie: Kerio has also some bug

March 14th, 2013 No comments

Today I solved one network issue. Customer has Tomcat webserver. This server is located at central site. Users which use this Tomcat website are located at branches. These branches are connected via MLPS network. There is Kerio in between MPLS network and central site. Problem was that people from central site could use Tomcat website, but people from branch offices couldn’t use it. After couple minutes of analyzing network using Wireshark, I found out that problem is caused by IP fragmentation.

I solved it by Enabling PMTU black hole detection and Disabling PMTU Discovery as described HERE.

I found also old article about this issue at Kerio support forum.

Quickie: Exchange analyzer as stant-alone applications

March 12th, 2013 No comments

Today was new version of Exchange testing applications released. More about it is HERE.

Run script in elevated mode with active UAC

March 4th, 2013 No comments

I had to run one vbs script on Windows 7 with UAC enabled. This script was implemented as part of Run/RunOnce technology in Windows. When you want some script/application to run everytime you log in or just once you log in, you can use this technology built-in Windows. You can read about it here. Implementation of these registry keys was easy. Problem raised when I found out that script doesn’t run in elevated mode – without administrative privileges.

If you need to run some script in elevated mode, you can right-click on script and select “Run as administrator”. This is fine, but what about script that is part of registries? There is no way to right-click 🙂 You have to use UNDOCUMENTED parameter “runas” of parameter ShellExecute of object Shell.Application. It’s really undocumented on official sites!

Another bad thing of running script in elevated mode is that you cannot access network drives which you have mapped. You need to remap them and then you can use them.

There are nice articles which describe how to run scripts in elevated mode:

This saved me couple hours of fight with scripts 🙂


VBS Script: How to find out actual path of running script

March 1st, 2013 No comments

When you need to find out what path is the running script located at you can use following script:

Dim strFullPath, strPath

strFullPath = WScript.ScriptFullName

strPath = Left(strFullPath, InStrRev(strFullPath,”\”))

Enjoy,

Quickie: Lync Server 2010 has same problem Exchange does

February 28th, 2013 2 comments

When I wanted to Enable AD users in Lync Server 2010 which were members of Domain Administrators and Enterprise Administrators I received error:

Active Directory operations failed on “DC_server”.  You cannot retry this operation: “Insufficient access rights to perform the operation 00002098: SecErr: DSID-03150E8A, problem 4003 (INSUFF_ACCESS_RIGHTS), data 0”

It’s same problem as Exchange has. You cannot be member of those two groups, because periodically all accounts in this groups have cleared Include inheritable permissions from this object’s parent and set explicit permissions by AD. But if you want to add members of those administrative groups into Lync you can check checkbox Include inheritable permissions from this object’s parent, enable user in Lync and uncheck checkbox Include inheritable permissions from this object’s parent after you are done.

Inheritance AD User

Exchange fixed this issue after couple year in Exchange 2010 SP3. Hopefully we will have some fix also for Lync Server.

Quickie: Updates for Lync Server 2010

February 28th, 2013 No comments

Today I was wondering why I don’t see any updates for Lync Server on Windows Update webpage. After couple minutes I found out article about LyncServerUpdateInstaller.exe. This little (50MB) utility will do updates for Lync Server.

Warning: This utility will not patch database. You need to use Install-CsDatabase instead as described in articles published with updates, which update database.

Microsoft Lync 2010 server – preparation of OS

February 25th, 2013 No comments

Today I started installation of Standard version of Microsoft Lync server. There are some prerequisites for OS where Lync server will run. Here is a quick step-by-step howto:

  • Installation of .NET Framework 3.5. Run following commands in Admin Powershell:
    • Import-Module ServerManager
    • Add-WindowsFeature NET-Framework-Core

Install .NET 3.5

  • In same Powershell windows run following command to install IIS Feature with all required components:
    • Add-WindowsFeature Web-Static-Content,Web-Default-Doc,Web-Http-Errors,Web-Asp-Net,Web-Net-Ext,Web-ISAPI-Ext,Web-ISAPI-Filter,Web-Http-Logging,Web-Log-Libraries,Web-Http-Tracing,Web-Windows-Auth,Web-Filtering,Web-Stat-Compression,Web-Mgmt-Console,Web-Scripting-Tools,Web-Client-Auth

Install all IIS requirements


  • Install RSAT-ADDS by running following command in same Powershell windows:
    • Add-WindowsFeature RSAT-ADDS

RSAT-ADDS installation


  • Reboot server
  • We need to install Windows Media Format Runtime. We can do it by running following command from elevated command prompt:
    • %systemroot%\system32\dism.exe /online /add-package /packagepath:%windir%\servicing\Packages\Microsoft-Windows-Media-Format-Package~31bf3856ad364e35~amd64~~6.1.7601.17514.mum /ignorecheck

Install WMFR


  • Press “Y” to reboot server again.

Tomorrow we will prepate Schema, Domain and Forest to support Lync 2010.